
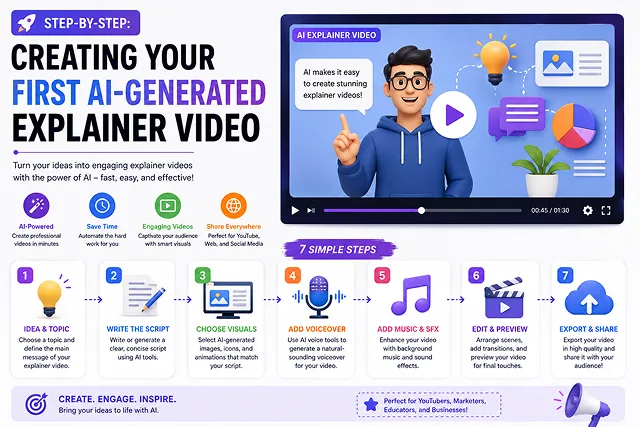
Explainer films clarify intricate concepts, commodities, or services into brief, visually appealing segments. Productions that originally took many weeks and cost thousands of dollars are done in under an hour nowadays.
It is essential to have a proper workflow when preparing a powerful AI-based explainer film. This will include preparing a compelling script, maintaining visual uniformity, recording attractive narration, and editing without any technical flaws.
Above-the-Fold Breakdown: Traditional Production vs. AI Video Creation
Production Efficiency Matrix · Traditional Workflows vs. AI-Powered Pipelines
| Production Metric | Traditional Video Production | AI-Powered Video Pipeline |
|---|---|---|
| Average Turnaround Time | 2 to 6 Weeks (Scripting, filming, editing) | 15 to 45 Minutes (End-to-end rendering) |
| Cost Per Video | $1,500 – $10,000+ per finished minute | $0.00 – $20.00 (Using native browser platforms) |
| Voiceover & Dubbing | Requires hiring regional voice talent | Instant AI voice cloning & 50+ languages |
| Visual Iteration & Editing | Reshooting requires renting studios and gear | Re-prompt scene elements in seconds |
| Scalability | High overhead limits output volume | Generate dozens of localized variations daily |
1. 6-Step Blueprint: Creating Your Explainer Video
Use this streamlined process for the production of your first AI-driven explainer video:
1. Decide on the Idea, Target Demographic, and Main Message
Identify three guiding points before using any AI-based tool:
- The Core Problem: The single pain point your viewer experiences.
- The Main Solution: Identify how your product/concept will address a challenge in the simplest possible sentence.
- The Target CTA: Specify what you want the audience to do after watching.
2. Create the Script and Fine-Tune It
The best explainer videos last somewhere between 60 to 90 seconds. This can put your script in the 150-225 words if you assume around 150 words per minute (WPM) of natural speech.
Here’s a high-retention script structure:
- Hook & Problem(0-15s): State the problem to get the audience’s attention.
- The Solution (15-25s): Present your idea or product.
- How It Works (25–65s): Break down 3 simple steps.
- The Core Benefit (60–80 seconds): Illustrate for the user how life improves.
- Call to Action (80–90 seconds): One action, one way forward.
3. Synthesize Natural AI Voiceovers
Copy your final script and paste it into an AI voice generator (e. G., ElevenLabs). Choose a warm, conversational voice.
- 40%–45% Stability – Adjust this level for natural human pitch variability in your voiceover.
- Export your voiceover as a high-bitrate MP3 file, or uncompressed WAV file.
4. Generate Scene-by-Scene Visual B-Roll
Break your script down scene by scene. Generate 3-to-5-second visual clips matching each spoken idea using AI video generators (like Kling 3.0, Luma, or Wan 2.2).
- Maintain Visual Style: Apply the same aesthetic style tags across all scene prompts (e.g., "clean vector motion graphics, vibrant isometric 3D render, soft studio lighting").
5. Assemble Timeline and Add Kinetic Subtitles
Import your audio track and visual clips into a video editor (like CapCut Desktop).
- Align visual cuts to match the voiceover pace.
- Generate bold auto-captions centered on screen.
- Add subtle background music set to -20dB behind the voiceover.
6. Final Quality check and Export
- Ensure visual movements appear clean, and the text has enough readability in smart screen displays. Export your finished clip at 1080p resolution for Full Hd (1920 x 1080) on Desktop and WEB, or 1080×1920 (9:16) for social shorts.
The AI Explainer Production Stack
Workflow Pipeline · Tool Selections & Deliverables Index
| Workflow Stage | Standard AI Tool Options | Core Output Deliverable |
|---|---|---|
| Scripting & Framing | ChatGPT-4o, Claude 3.5 Sonnet, Notion AI | Time-coded script & scene breakdown |
| AI Voiceovers | ElevenLabs, Google Veo 3.1, Murf AI | High-fidelity voice track (~150 WPM) |
| Visual B-Roll & Scenes | Sora 2, Kling 3.0, Wan 2.2, LTX Studio | Scene-by-scene 4K video clips |
| Subtitles & Post-Editing | CapCut Desktop, InVideo AI, Descript | Polished MP4 with kinetic captions |
Request A Custom AI Video
Tell us what you're trying to create and we'll point you to the right tool — or help you set it up.
Deep Dive: The 3 Visual Formats for AI Explainers
Before rendering scenes, select the exact visual format that aligns with your product or message:
- Format A [Kinetic Motion Graphics]: Text Prompt ➔ 2D/3D Vector Asset Generation ➔ Motion Interpolation
- Format B [Digital Avatar Presenter]: Text Script ➔ 3D Mesh Extraction ➔ Active Lip-Syncing (HeyGen/Synthesia)
- Format C [Generative B-Roll Scenes]: Script Segments ➔ Diffusion Transformer Pass ➔ Cinematic Video Cuts
Format Selection Matrix:
- Digital Avatars and Presenters (HeyGen, Synthesia): Primarily used in business-to-business communications, training programs, and instructional videos by a human voice to establish trust.
- Kinetic Vector Graphics and 3D Animation (Vyond, Canva): The ideal tool for conveying complicated data processes, cyber security, and abstract concepts using visual elements.
- Generative Photorealistic Footage (Veo 3.1, Kling 3.0): The preferred option when dealing with tangible items, lifestyle brands, and narrative trailers because the sights capture the viewer’s emotions.
Advanced Multi-Scene Prompt Scripting (Scene Locking)
The biggest challenge in generative AI video is visual drift—where a character, room, or product looks completely different from one shot to the next.
To solve this, use an Aesthetic Style Anchor prefix at the start of every scene prompt:
Three General Rules for Very Fast Token Processing:
- [Global Style Anchor]: The isometric style of corporate 3D animation features soft studio lights and the color scheme consisting of light blue and dark gray, involves details in high quality and the use of 4K technology.
- [Scene 1 - Problem (0-5s)]: The corporate 3D animation style denoted above plus a very messy table, floating light red warning signs above a computer screen, and a worried office worker staring at the screen.
- [Scene 2 - Solution (5-10s)]: [Global Style Anchor] + A glowing green shield popping up on the laptop screen, sweeping away the red warning icons into organized blue data streams.
- [Scene 3 - Result (10-15s)]: [Global Style Anchor] + The professional smiling at a clean, organized dashboard showing rising green analytics charts.
Post-Production Audio Engineering & Mixing
The combination of a flat and unedited voiceover with background music that is played at equal volume makes it impossible for the viewer to stay focused. Follow this 3-Pass Timeline Mixing Strategy:
[Voiceover Track] ─────────➔ Boost 2kHz - 5kHz (Speech Clarity EQ) │ ▼ [Music Track] ─────────➔ Apply Sidechain Ducking (-18dB Drop during Speech) │ ▼ [Transition SFX] ─────────➔ Align Pops/Whooshes to Visual Cut Transitions
- Voiceover EQ and Compression: A gentle high-pass filter should be used in the vicinity of 80Hz to filter mic noise, and the frequency bands from 2kHz to 5kHz should be elevated to guarantee clarity and high level of intelligibility while the narration plays over the phone speakers.
- Sidechain Audio Ducking: In the background music track, -16dB to-20dB drop should be instantiated in the music.
- Transition SFX Placement: Sound Effects should be added to every visual scene transition with the deployment of soft sound effects (such as whooshes, UI sound effect pops, soft bass drops) to gain the viewer's attention.
Explainer Video Production Primer
Master end-to-end script structuring, voice synthesis, B-roll generation, and timeline assembly.
The complete end-to-end workflow follows six core milestones: 1. Conceptualize & Script (generating a 2-column script via an LLM), 2. Synthesize Audio (converting script lines into natural AI voiceovers), 3. Generate Visual Assets (creating matched B-roll clips using video transformers or stock libraries), 4. Auto-Caption & Style (burning dynamic subtitles onto the timeline), 5. Audio Mixing (layering background score tracks with stem separation), and 6. Final Master Export (rendering to crisp 1080p or 4K resolution).
Use ChatGPT, Claude, or Gemini with a structured Hook-Problem-Solution-CTA prompt. Instruct the model: "Write a 130-word explainer script in a 2-column table format (Column 1: Spoken Voiceover | Column 2: Exact Visual B-Roll Prompt). Hook the viewer in the first 3 seconds, outline the main user friction point, present our solution, and end with a clear Call to Action."
For an all-in-one automated workspace, InVideo AI or CapCut AI can assemble the entire video from a single script prompt. If you prefer a modular, higher-quality stack: use ChatGPT for scriptwriting, ElevenLabs for expressive voiceovers, Kling AI or Luma Dream Machine for custom B-roll generation, and CapCut Desktop or Premiere Pro for final timeline composition.
Use specialized AI avatar platforms like HeyGen, Synthesia, or D-ID. Select a stock digital presenter or upload a studio portrait, paste your script into the voice engine, and trigger generation. The platform maps lip movements to phonemes automatically, providing a realistic video presenter to guide audience attention through complex topics.
Maintain a steady visual pacing by changing or modifying on-screen elements every 2 to 4 seconds. Sticking on a single static visual for more than 5 seconds causes viewer engagement to drop significantly. Alternate between AI video clips, motion graphics, animated text callouts, and subtle zoom movements to keep the audience focused on key concepts.
In neural TTS engines like ElevenLabs or Fish Audio, adjust the vocal stability slider to roughly 50-60% and style exaggeration to moderate levels. Inject natural punctuation (dashes, commas, and ellipsis) into your script text to guide pacing, or add explicit emotion tags (like *excited* or *thoughtful*) to ensure the narration sounds expressive and engaging.
Because up to 70% of viewers scroll through web and social feeds with audio turned off, kinetic auto-captions ensure your message is communicated clearly without sound. Dynamic captions highlight spoken words individually with high-contrast colors, improving accessibility while reinforcing retention for viewers listening with audio enabled.
Apply Audio Ducking inside your video editor. This feature automatically lowers the background music volume by -12dB to -18dB whenever speech is detected on the voiceover track. Additionally, choose instrumental background tracks without prominent vocal elements so the music doesn't compete with the main narration.
Set your canvas dimensions according to your primary distribution platform: choose 16:9 widescreen (1920x1080) for YouTube, website landing pages, or corporate presentations, or select 9:16 vertical (1080x1920) for YouTube Shorts, TikTok, and Instagram Reels. Always export master files in high-bitrate MP4 (H.264) or ProRes formats at 30fps.
Follow this final 3-Point Pre-Flight Review Pass: First, review caption text line-by-line to fix proper noun spellings or brand names. Second, double-check visual clips to ensure no AI generation artifacts (like distorted limbs or wobbly backgrounds) slip through. Third, listen on mobile speakers to confirm the voiceover remains crisp and prominent over the background track before hitting publish.